Tuesday 30 July 2013

Orange & White Chocolate Cake


My Granny is one of the most lovely ladies I know. She has a heart of gold and I think each of my four sisters would agree with me when I say she's the best Granny we could ask for; she never forgets a birthday, sends me the loveliest cards before every single one of my collections at university, and I frequently open my inbox to find a chatty email from her. (Yeah, she's completely down with the text and internet thing too - 21st century Granny!)

I also know that she is one of my most dedicated followers (Hi Granny!), and for that if nothing else she deserves a marvelous birthday cake! I fancied baking a cake a little lighter than my previous two monsters (Lime & Pistachio and Chocolate Honeycomb). This cake seemed perfect: light and refreshing, just what we needed after a delicious lunch at a local French-style cafe.

This recipe, with some minor alterations, is from The Clandestine Cake Club Book. I used my neighbour's chickens freshly laid eggs for extra freshness. There's nothing like baking with eggs quite that local!

Ingredients:
225g butter, softened
225g caster sugar
4 large eggs, beaten
225g self raising flour
zest of 1 large orange
1/2 tsp baking powder
1 tbsp milk
icing sugar, to dust
orange slice, to decorate
(I also added a teeny weeny bit of orange juice, and a drip-drop of vanilla essence)
For the orange syrup:
grated zest and juice of 1 large orange
1 tsp orange blossom water or 2 tsp Cointreau
1 tsp caster sugar
For the white chocolate icing:
150g white chocolate
grated zest of 2 large oranges, plus 4 tbsp juice
200g butter, softened
75g icing sugar

Method:
Preheat the oven to 190 degrees Celsius (fan 170). Grease and line two 20cm round sandwich tins.

Beat the butter and sugar until light and fluffy, then add the eggs gradually, beating well after each addition, and adding a tablespoon of flour with the final addition to help prevent curdling. Mix in the orange zest, then fold in the remaining flour and the baking powder until thoroughly combined. If the mixture looks a little stiff then add a little milk.  (I didn't need to as I added some orange juice.)


Divide the mixture between the tins and bake for 20-25 minutes (mine took 25 mins but it completely depends on your oven.) Leave in the tins to cool slightly.


Meanwhile, make the syrup. Put the orange zest, juice, orange blossom water, and sugar into a pan over a low heat and stir until the sugar has completely dissolved, then bring to a simmer. Remove from the heat and leave to cool a little. Turn the cakes out of the tins onto a wire rack, then spoon the syrup over the two sponges. Do not over soak them - you may not need all the syrup. Leave the cakes to cool completely.


To make the chocolate filling, place the chocolate in a heat proof bowl. Put the orange zest and juice in a small saucepan and bring to the simmer. Simmer for a couple of minutes, then pour over the chocolate. Stir until thoroughly combined and the chocolate has completely melted. If it does not fully melt, set the bowl of chocolate mix over a pan of simmering water and stir gently. Set aside to cool COMPLETELY. 


In a separate bowl, beat the sugar and icing sugar until light and fluffy. Gradually add the COLD chocolate, beating all the time, until thoroughly combined. (BE WARNED: IF THE CHOCOLATE MIXTURE IS STILL WARM IT WILL MELT THE BUTTER AND THE MIXTURE WILL SPLIT!!)

Sandwich together the cooled cakes with the filling, then dust the top with icing sugar and decorate with a slice of orange.

Here's a picture of Granny herself cutting a slice of cake. The sponge was beautifully soft and fluffy, a darn good bake even if I do say so myself! It was just the right way to end a very happy day.


If you like the look of this but fancy something a little more exotic, then try this Passionfruit Cake for an equally refreshing summer treat. 

Saturday 27 July 2013

Macaroons

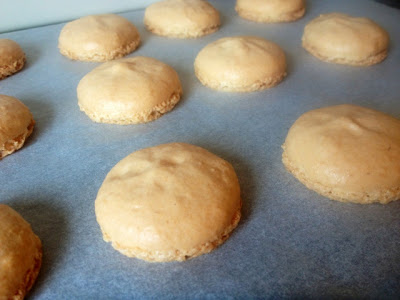
CAN SOMEONE PLEASE TELL ME HOW TO GET RID OF THIS GINORMOUS GAP?! Will pay in baked goods.


My parents have abandoned me this weekend to visit some family friends, leaving me with only three dogs and a baking cupboard full of supplies. I suppose being home alone means i'm supposed to secretly throw some sort of crazy party. However, i'd simply rather just bake. So bake I did.

I've been attempting to master macaroons for a fair time now, however no attempts thus far have been bloggable. So when I spotted a recipe in this month's edition of Woman & Home's Feel Good Food, it just had to be the one I dedicated my home alone time to.

The recipe makes about 30 macaroons, half with a salted caramel filling and half with a pistachio buttercream. 

Ingredients:
3 large egg whites
65g granulated sugar 
2 drops vanilla extract
150g icing sugar, sifted (MUST be sifted)
85g ground almonds 
For the salted caramel filling:
225g dulce de leche or Carnation Caramel
1/2 tsp sea salt
For the pistachio buttercream:
50g unsalted butter
85g icing sugar
50g ground pistachios
2 drops green food colouring (optional)
2tbsp milk

Method:
Whisk the egg whites with an electric whisk until stiff. Add the granulated sugar in two batches, whisking between each addition. Add the vanilla, whisk until stiff. 


Add the icing sugar to the almonds and sift half into the egg whites. Fold in with a spatula, then sift in the rest of the mixture and fold in, until the mixture is glossy and drops off the spatula when lifted. 

Transfer to a piping bag and pipe 3cm diameter circles leaving gaps between them. (It helps to draw out the circles on the baking parchment first.) Rap the bottom of the trays sharply on the kitchen surface, then rest somewhere to dry for one hour. Do NOT put them in the fridge. 


For the fillings, combine the dulce de leche/Carnation Caramel with the salt, then transfer to a piping bag and rest in the fridge. Beat together the pistachio buttercream ingredients and then add the food colouring. (When I first added my colouring I regretted it as it immediately became bright green, but it actually looks great when sandwiched between the macaroon shells!) 


Heat the oven to 190 degrees Celsius (170 fan). When the macaroons have hardened and their shells are no longer sticky to the touch, place in the middle of the oven on top of a second tray to protect their bottoms from burning. Cook the macaroons for 10 to 12 minutes. They should have risen and be glossy on top, with a bubbled rim on the bottom known as the "foot." Remove from the oven and allow to cool completely before removing from the baking parchment. 


Fill half the macaroons with caramel and half with the buttercream. They're best served on the day they are made, but will keep for 3 days in an airtight container. 


If you've never made macaroons before I urge you to try this recipe. It was really super simple. Next time I think i'll make the caramel myself and beat it into a buttercream; I don't like the taste of Carnation Caramel very much! 

Happy baking! :) 

Sunday 21 July 2013

Salted Caramel Truffles


(Please excuse the ginormous gap at the opening of this post, I am on the verge of having a blogspot induced nervous breakdown where formatting is concerned.)

Courtesy of Edd Kimber's beautiful book "Say It With Cake", these truffles only served as fuel to my current salted caramel addiction. They were requested by my sister especially to top her Chocolate Truffle and Honeycomb Cake, the recipe for which will be up soon! 

They come with a warning though; it is hopelessly difficult to bake anything with salted caramel in it without devouring all the caramel before actually using it... and consuming one's body weight in salted caramel can't be healthy. 

Here's the recipe:

Ingredients:
300g dark chocolate 
300g caster sugar 
300ml double cream
1/2 tsp vanilla extract
20g light brown sugar 
20g unsalted butter 
1/2 tsp flaked sea salt 
cocoa powder, for dusting 

Method:
Put the chocolate in a medium heatproof bowl and set aside. Put the caster sugar in a medium pan over medium heat and leave until the sugar begins to dissolve and caramelize around the edges. Using a silicon spatula, drag the dissolved sugar towards the middle to help it dissolve evenly.

Once the sugar is fully dissolved and has turned a dark golden brown colour, pour in half the cream, and all the vanilla and light brown sugar, it will bubble up furiously, so be careful and go sl
owly. Once the bubbling has subsided, add the remaining cream. If the caramel is lumpy, put over a low heat and allow to melt. Once you have a smooth caramel, add the butter and sea salt, and stir gently to combine. 

Pour the hot caramel over the chocolate and stir gently to combine. Chill until firm enough to roll into balls. 

To make the truffles, have a small bowl of cocoa powder ready and a baking tray lined with baking parchment. Take large teaspoons of the ganache mixture and roll into balls, then roll in the cocoa powder and set on the baking tray. Chill the truffles until needed. 

Maybe it has something to do with my distinct lack of hand-eye coordination, but when making these I discovered I am completely useless at rolling things into ball shapes. Hence, these were more of squashed spheres. But that just adds to the authenticity really, doesn't it? I hope Edd would agree. 

These would make a perfect gift, just like my Fresh Blueberry Marshmallows!